Local Setup Instructions
Project Setup With Docker
The central instance of COPO runs on a pool of three virtual machines (VMs) - a swarm manager and two swarm workers that host the service and web containers. However, for simplicity, this local setup uses a single node.
Step 1: Create Secrets
mkdir local-project-setup
cd local-project-setup
Replace
local-project-setupin the command above with the name of the directory you would like to create.
cat <<EOF > .env
vault_copo_mongo_initdb_root_password=secret123
vault_copo_bioimage_path=secret123
vault_copo_mail_password=secret123
vault_copo_nih_api_key=secret123
vault_copo_orcid_client_id=secret123
vault_copo_orcid_secret_key=secret123
vault_copo_public_name_service_api_key=secret123
vault_copo_web_secret_key=secret123
vault_copo_webin_user=secret123
vault_copo_webin_user_password=secret123
vault_ecs_secret_key=secret123
vault_ecs_access_key=secret123
ZENODOTOKEN=secret123
vault_copo_bioimage_password=secret123
EOF
Step 2: Download COPO project
Download the COPO project to your local machine. It does not have to be
downloaded in the same directory (local-project-setup) where the secrets
were created in step 1.
Note
Take note of the absolute path to the project directory on your local machine as it will be used in the Docker compose file to mount the project directory as a volume in the Docker container in step 3.
git clone https://github.com/EarlhamInst/COPO-production.git
Alternatively, download the
GitHub project ZIP filethen, extract it on your local machine.
Step 3: Create a Docker Image
Important
The following commands should be executed in the terminal in the
local-project-setup directory that was created in step 1.
Tip
Substitute all items enclosed in angle brackets (<>) with the appropriate values for your local setup.
cd local-project-setup
wget https://raw.githubusercontent.com/EarlhamInst/COPO-production/refs/heads/main/deployment/local.copo.compose.linux.yaml
Alternatively, download the
Linux Docker compose filethen, extract it on your local machine.
vim local.copo.compose.linux.yaml
wget https://raw.githubusercontent.com/EarlhamInst/COPO-production/refs/heads/main/deployment/local.copo.compose.mac.yaml
Alternatively, download the
Mac Docker compose filethen, extract it on your local machine.
vim local.copo.compose.mac.yaml
services:
  copo_web:
    # Edit the image tag to reflect what you would like to build
    image: local_copo_web:v1.0.0
    ...
    ...
    # Edit the absolute path to the project directory on your local machine
    volumes:
      - /<path-to-project-directory>/COPO-production:/copo
Explanation of the commands above:
vimis used as an example to edit files but you can use any text editor of your choice to edit the compose file likenano.-
The local Docker image is created with the tag,
local_copo_web:v1.0.0.local_copo_webis the name of the Docker image andv1.0.0is the version. The path,
/<path-to-project-directory>/COPO-productionis the absolute path to the project directory on your local machine./copois the path to the Django project app within the Docker container.In the Docker compose file, the environment variables related to European Nucleotide Archive (ENA) are configured to use the ENA development server. Submissions to this server are deleted after 24 hours. To submit to the production ENA server, remove
devfrom the values.
Step 4: Build Docker Image
Important
The following commands should be executed in the terminal in the
COPO-production directory that was downloaded in step 2.
cd COPO-production
docker build . -f 'deployment/web/Dockerfile_local_linux' -t local_copo_web:v1.0.0
docker build . -f 'deployment/web/Dockerfile_local_mac' -t local_copo_web:v1.0.0
The Docker image tag,
local_copo_web:v1.0.0, references the tag that was created in the Docker compose file in step 3.The Dockerfile is located in the deployment/web directory of the COPO project. Use the appropriate Dockerfile for your operating system (OS).
Step 5: Deploy the Docker Image
Important
The following commands should be executed in the terminal in the
local-project-setup directory that was created in step 1.
It should have the .env file and Docker compose file that were created in step 1 and step 3 respectively.
cd local-project-setup
export $(cat .env) > /dev/null 2>&1; docker compose -f local.copo.compose.linux.yaml up -d
export $(cat .env) > /dev/null 2>&1; docker compose -f local.copo.compose.mac.yaml up -d
docker ps
Step 6: Execute Celery & Django commands
# Retrieve the "local_copo_web" container ID
$ docker ps

# Enter the container using the ID
$ docker exec -it <local-copo-web-container-id> bash
python manage.py makemigrations
python manage.py makemigrations allauth
python manage.py migrate
python manage.py setup_groups
python manage.py createcachetable
python manage.py setup_sequencing_centres
python manage.py social_accounts
# Exit the "local_copo_web" container by inputting:
  CTRL + P
  CTRL + Q

# Retrieve the "copo/copo-mongo" container ID
$ docker ps

# Enter the container using the ID
$ docker exec -it <copo-mongo-container-id> bash
# Enter the Mongo shell
mongosh

# Switch to the "admin" database
use admin

# Authenticate as "copo_admin" user
db.auth("copo_admin", "password")

# Initialise the replica set
rs.initiate()
# Exit the "copo-mongo" container by inputting:
  CTRL + P
  CTRL + Q

# Retrieve the "local_copo_web" container ID
$ docker ps

# Enter the container using the ID
$ docker exec -it <local-copo-web-container-id> bash
python manage.py setup_schemas
python manage.py setup_associated_profile_types
python manage.py setup_profile_types
python manage.py setup_news
python manage.py createsuperuser
Enter the required details to create a Django admin or superuser. This individual will have the privilege to log into the admin section of the COPO project using URL, http://127.0.0.1:8000/admin.
# Switch to root user if not already it
sudo -i

# Execute celery commands
celery -A src call src.apps.copo_single_cell_submission.tasks.update_singlecell_schema
celery -A src call src.apps.copo_core.tasks.update_ena_read_checklist
celery -A src call src.apps.copo_core.tasks.update_ena_checklist
celery -A src call src.apps.copo_core.tasks.update_ena_read_platform
Step 7: Launch COPO website
7.1: Download Visual Studio Code
Visual Studio Code (VS Code) is an integrated development environment (IDE) recommended for running the COPO project on your local machine. It can be downloaded from the VS Code website.
7.2: Install extensions to Visual Studio Code
Navigate to the Extensions tab (indicated by the  icon) on the left-hand side of the VS Code window.
Then, search for and install the following extensions:
icon) on the left-hand side of the VS Code window.
Then, search for and install the following extensions:
Dev Containers by Microsoft Corporation
Python by Microsoft Corporation
Python Debugger by Microsoft Corporation
7.2.1: Optional applications to install on your local machine
Docker Desktop: a graphical user interface (GUI) application that allows you to manage Docker containers and images. It can be downloaded from the Docker Desktop website.
-
Studio 3T Community Edition: a GUI application that allows you to manage your MongoDB databases. It can be downloaded from the Studio 3T website.
Local connection string to connect to MongoDB database in the Docker containermongodb://copo_user:password@localhost:27017/admin?retryWrites=true&loadBalanced=false&connectTimeoutMS=10000&authSource=admin&authMechanism=SCRAM-SHA-1
7.3: Use Dev Containers extension to launch the COPO project application
7.3.1: Click the Dev Containers extension (which was installed in step 7.2) on the left-hand side of the VS Code as shown in the image below.
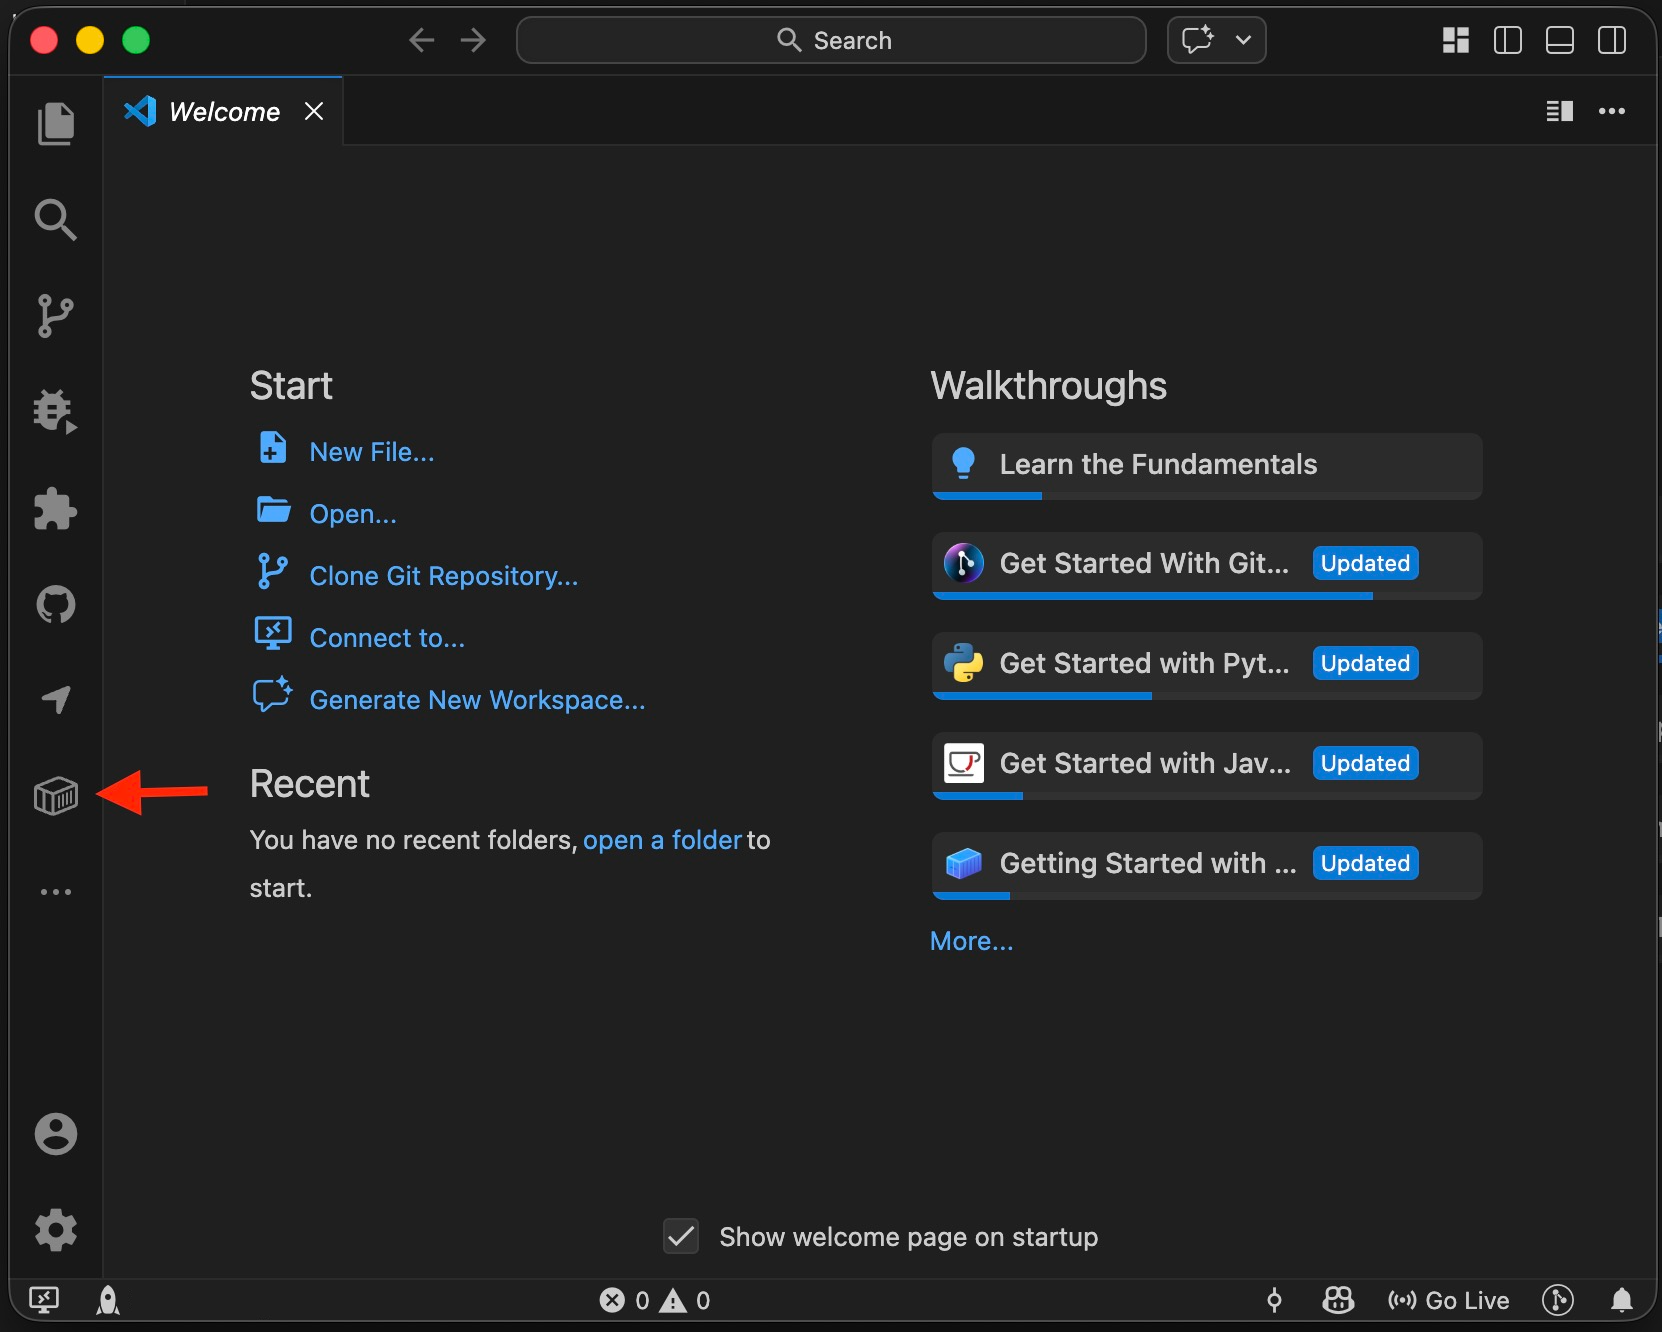
Click Dev Containers VS Code extension
7.3.2: Right-click on the local_copo_web:v1.0.0 container under the
CONTAINERS section then, click “Attach Visual Studio Code” as shown in the
image below.
Note
Note that the example below uses the Docker tag, local_copo:v1.0.0.
This corresponds to the tag you created for the local Docker image in
step 3 where it was specified as local_copo_web:v1.0.0.
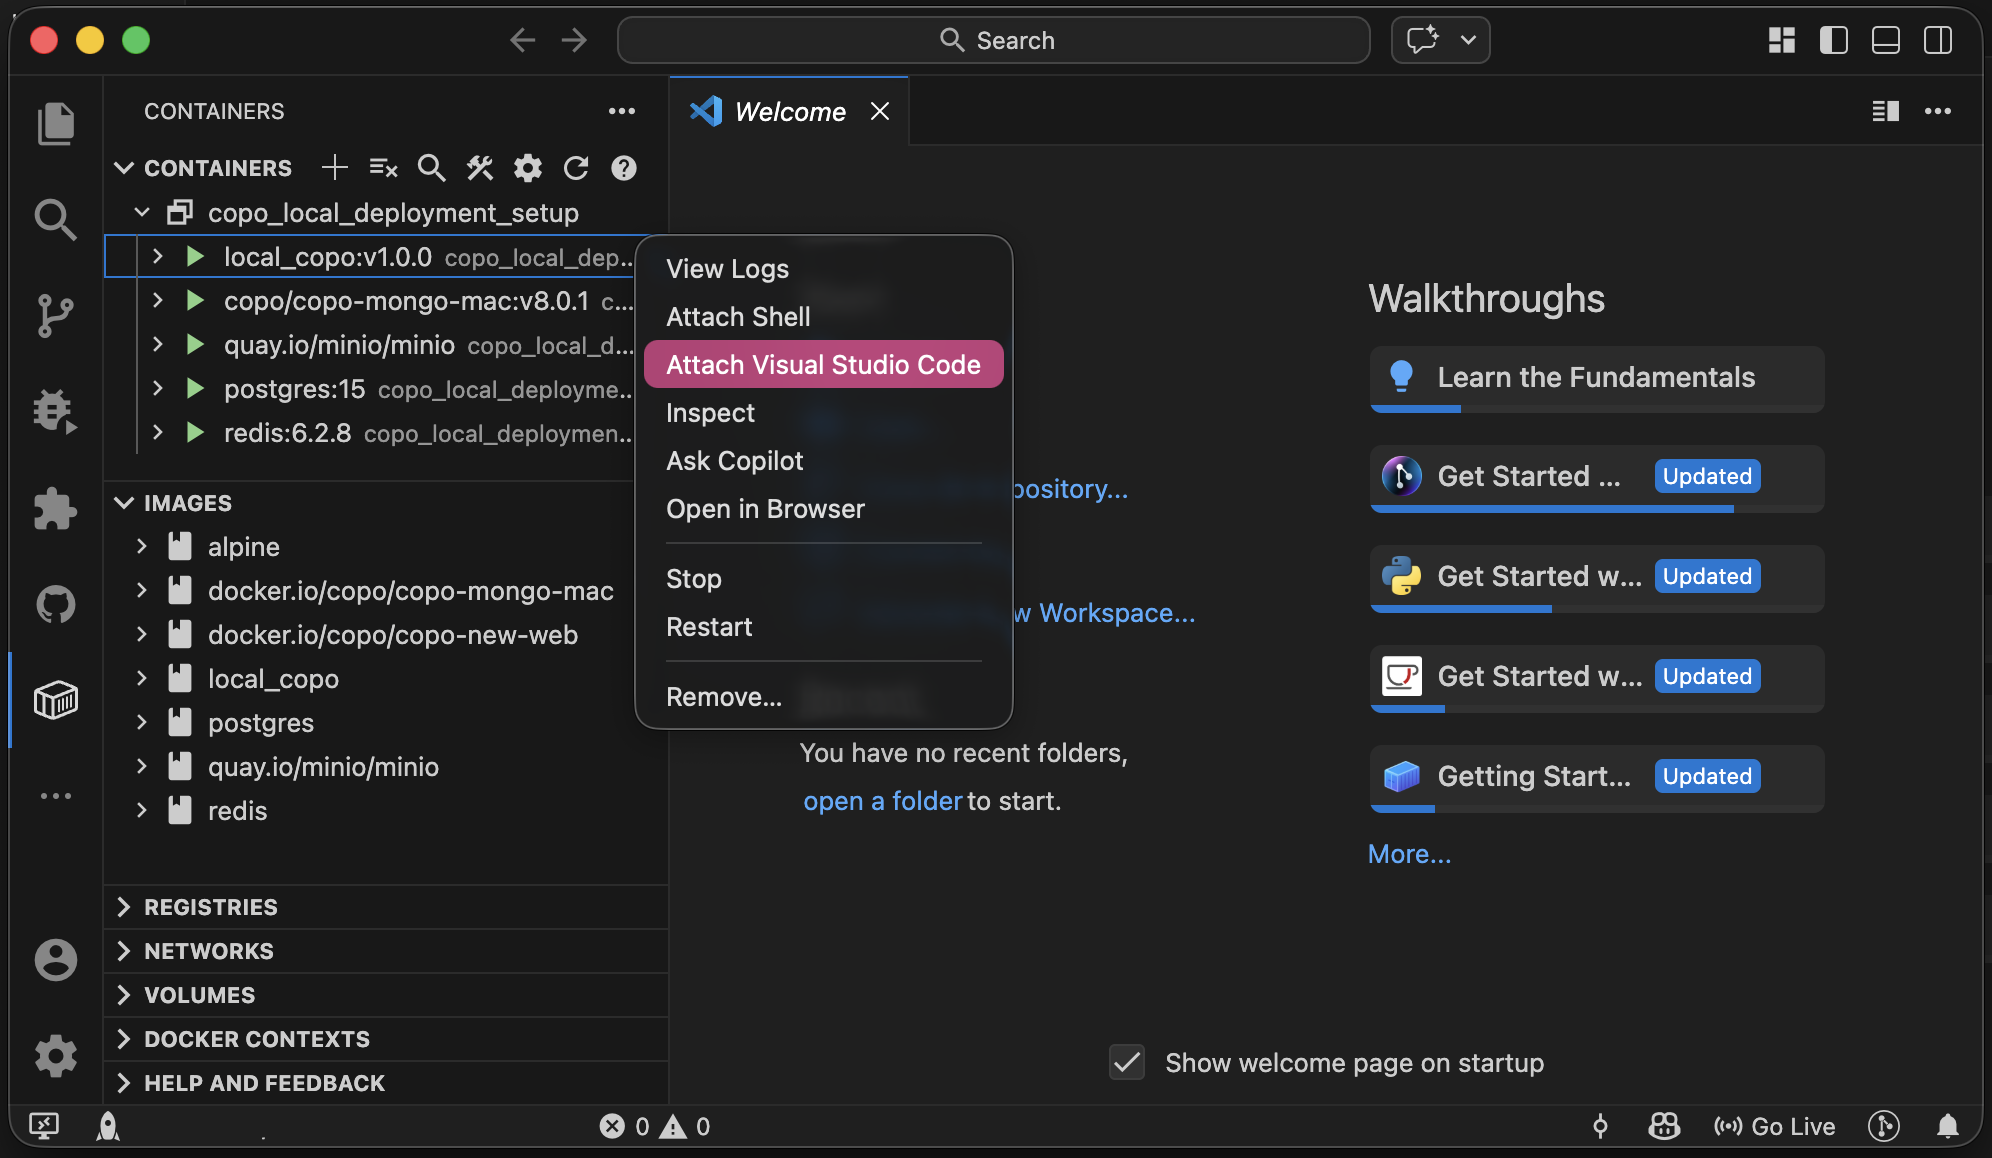
Click Attach Visual Studio Code option for local_copo_web:v1.0.0 Docker container
7.3.3: Click “Open Folder” button under the EXPLORER section. Then,
enter /copo in the prompt that appears and click “OK” to open the project
folder in the container.
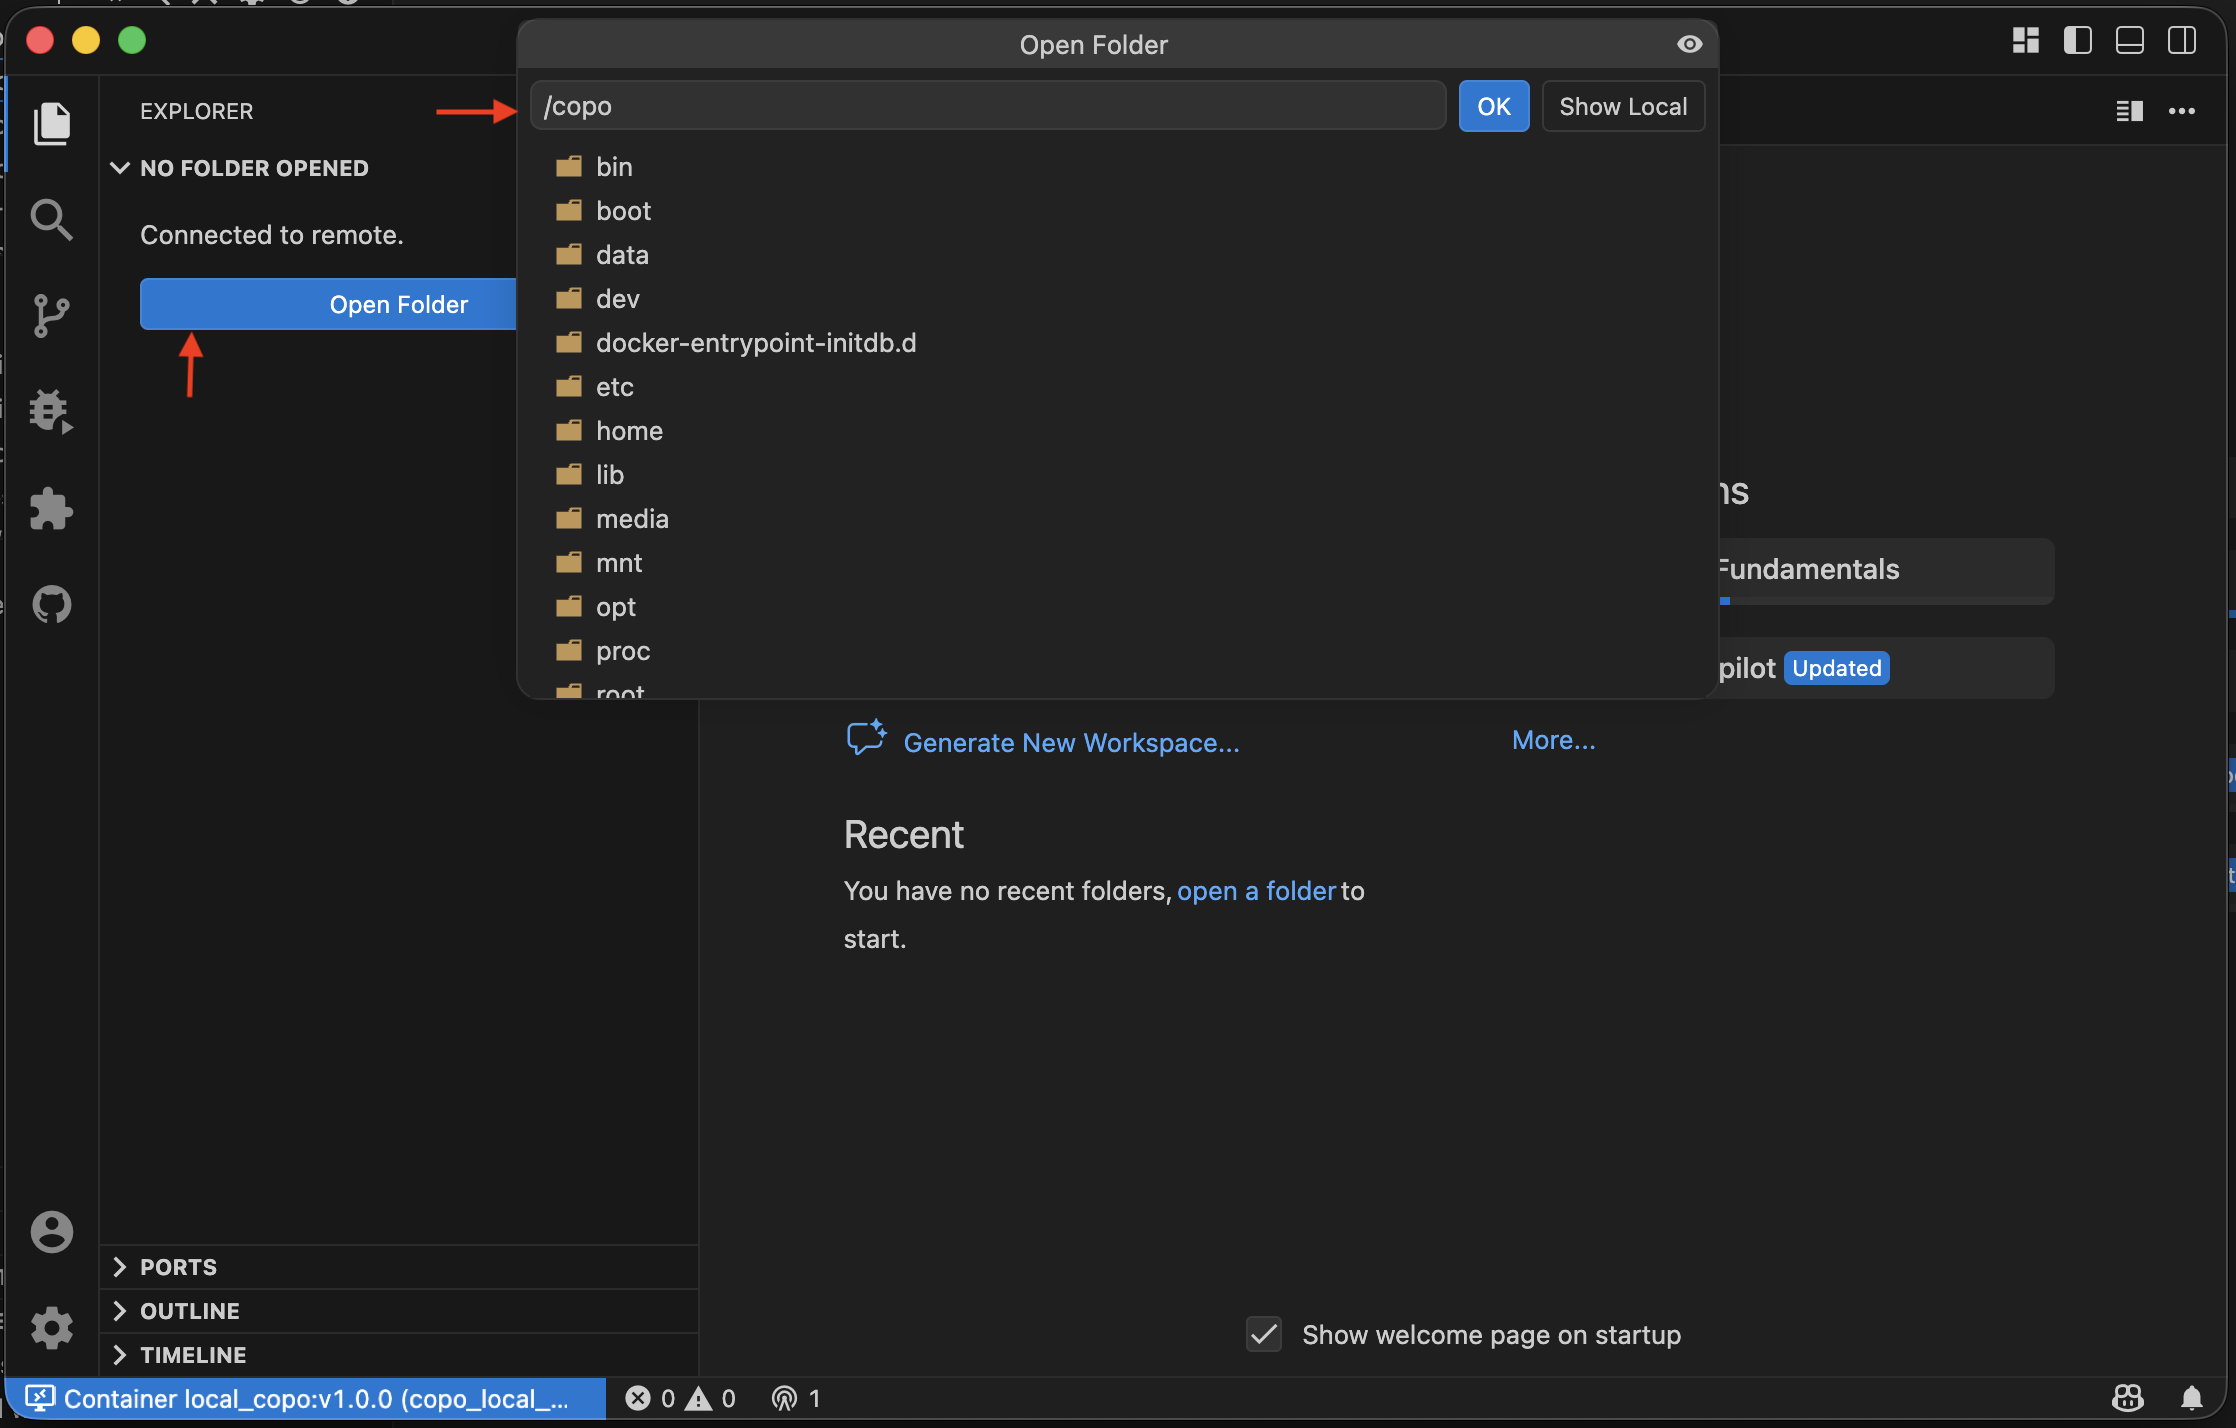
Open /copo directory in the Docker container
If prompted, enable Manage Unsafe Repositories in Source Control section in VS Code to allow it to access the project directory.
7.3.4: Click  to navigate to the
Run and Debug section. Then, click the dropdown menu next to the green
play button.
to navigate to the
Run and Debug section. Then, click the dropdown menu next to the green
play button.
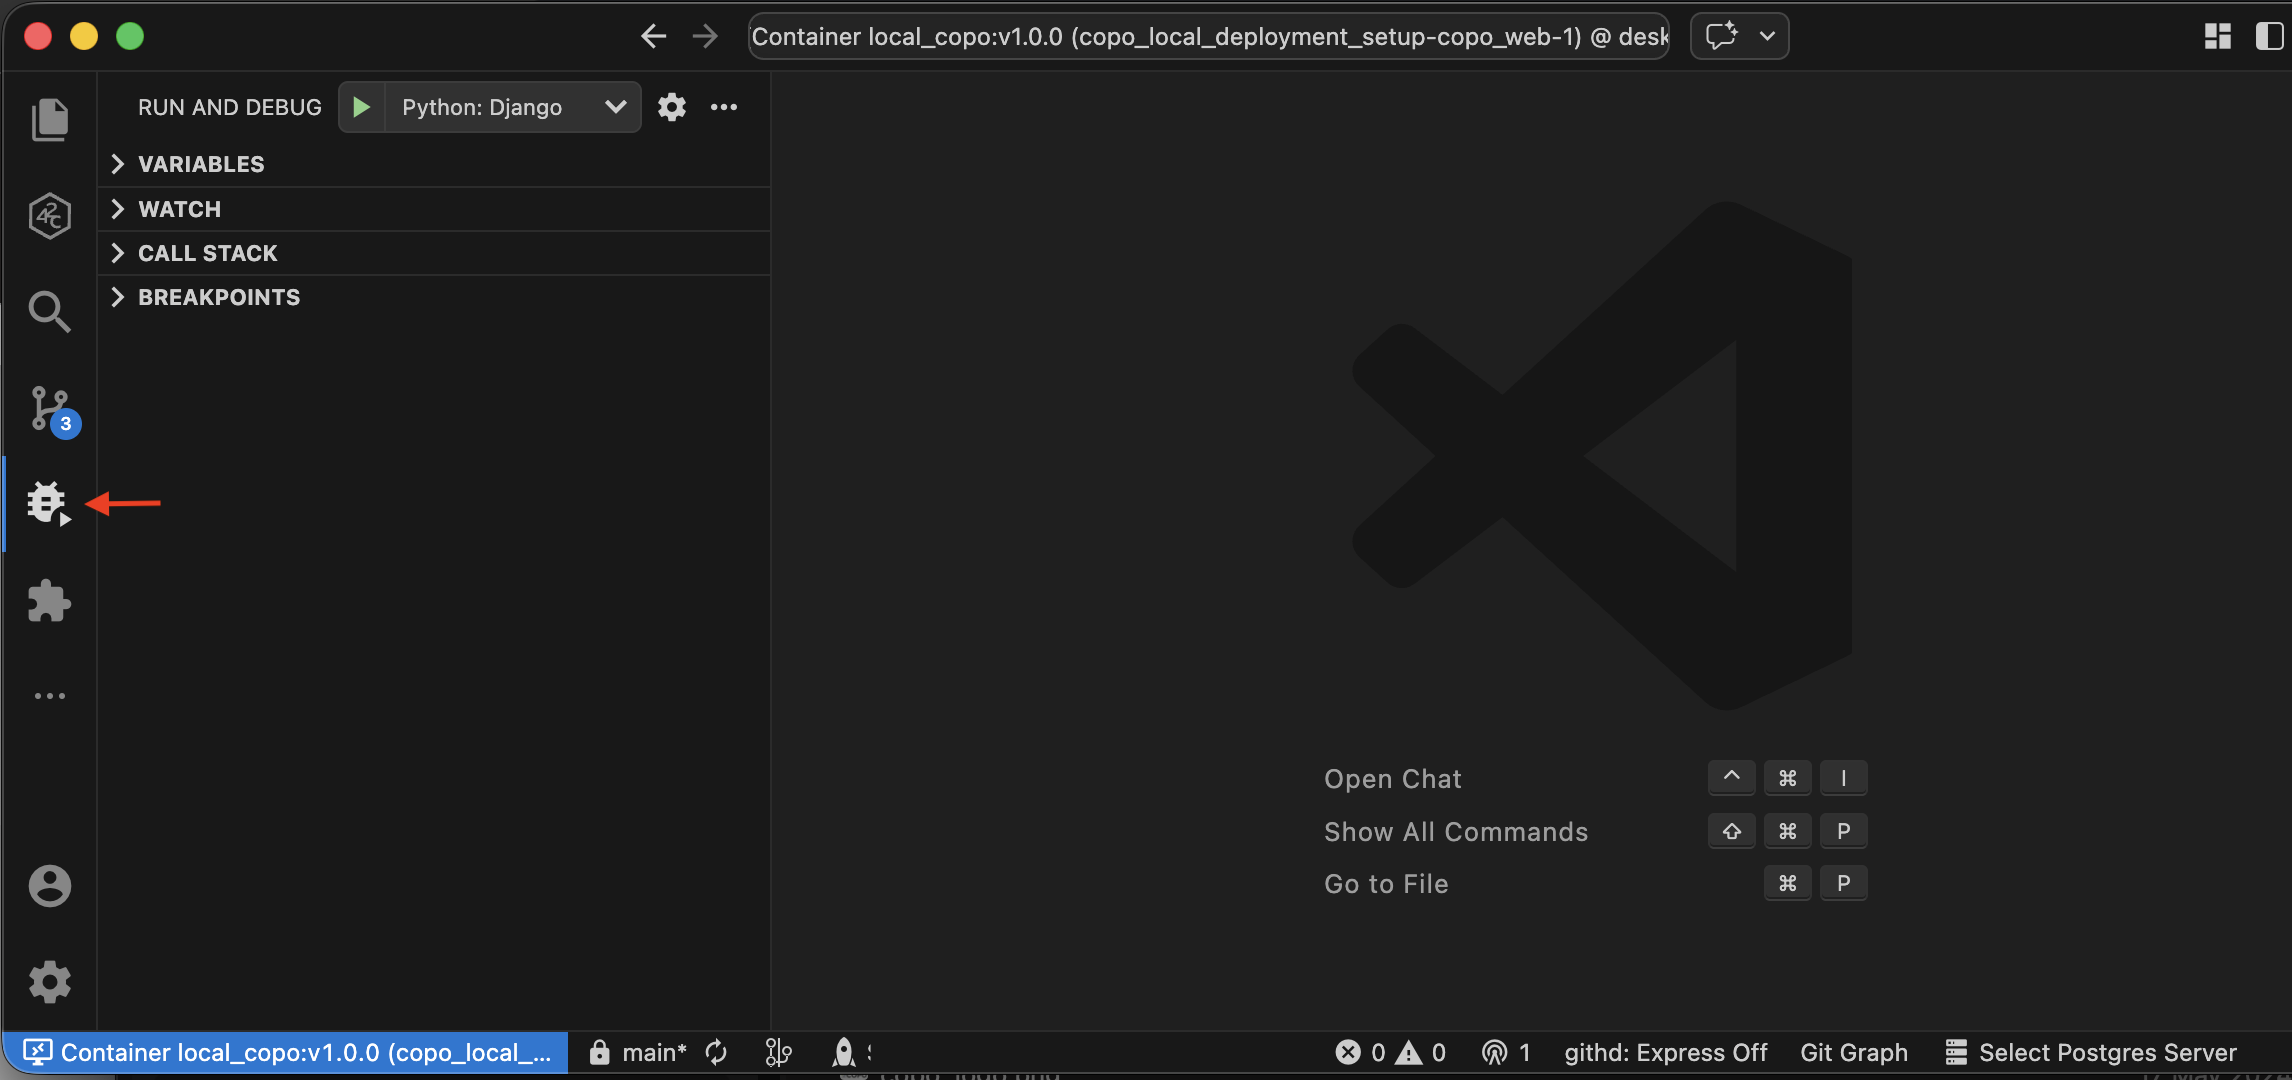
Click run and debug icon
7.3.5: A list of configurations will be displayed. They are set up in
the launch.json file located in the .vscode directory in the project.
Click the following configurations to run the COPO project application:
Python: Django
Python: Celery Beat
Python: Celery Workers
Click to view the contents of the VS Code launch.json configuration file
{
  // Use IntelliSense to learn about possible attributes.
  // Hover to view descriptions of existing attributes.
  // For more information, visit: https://go.microsoft.com/fwlink/?linkid=830387
  "version": "0.2.0",
  "configurations": [
    {
      "name": "Python: Django",
      "type": "debugpy",
      "request": "launch",
      "program": "${workspaceFolder}/manage.py",
      "env": {
        "PYTHONPATH1": "${workspaceFolder}/lib:${PYTHONPATH}"
      },
      "args": ["runserver", "0.0.0.0:8000"],
      "django": true,
      "justMyCode": false
    },
    {
      "name": "Python: Django Shell",
      "type": "debugpy",
      "request": "launch",
      "program": "${workspaceFolder}/manage.py",
      "env": {
        "PYTHONPATH1": "${workspaceFolder}/lib:${PYTHONPATH}"
      },
      "args": ["shell_plus", "--ptpython"],
      "django": true,
      "justMyCode": false
    },
    {
      "name": "Python: Django makemigration",
      "type": "debugpy",
      "request": "launch",
      "program": "${workspaceFolder}/manage.py",
      "env": {
        "PYTHONPATH": "${workspaceFolder}/lib:${PYTHONPATH}"
      },
      "args": ["makemigration"],
      "django": true,
      "justMyCode": false
    },
    {
      "name": "Python: Celery Workers",
      "type": "debugpy",
      "env": {
        "GEVENT_SUPPORT": "true"
      },
      "request": "launch",
      "module": "celery",
      "console": "integratedTerminal",
      "args": [
        "-A",
        "src",
        "worker",
        "-l",
        "debug",
        "-P",
        "gevent",
        "--concurrency",
        "10",
        "-Q",
        "celery",
        "-E",
        "--hostname=celery@%h"
      ],
      "justMyCode": true
    },
    {
      "name": "Python: Celery Workers file_transfers",
      "type": "debugpy",
      "env": {
        "GEVENT_SUPPORT": "true"
      },
      "request": "launch",
      "module": "celery",
      "console": "integratedTerminal",
      "args": [
        "-A",
        "src",
        "worker",
        "-l",
        "debug",
        "-P",
        "gevent",
        "--concurrency",
        "10",
        "-Q",
        "file_transfers",
        "-E",
        "--hostname=file_transfers@%h"
      ],
      "justMyCode": true
    },
    {
      "name": "Python: Celery Beat",
      "type": "debugpy",
      "request": "launch",
      "module": "celery",
      "console": "integratedTerminal",
      "args": ["-A", "src", "beat", "-l", "critical"]
    },
    {
      "name": "Python: Generate standards map",
      "type": "debugpy",
      "request": "launch",
      "program": "${workspaceFolder}/manage.py",
      "env": {
        "PYTHONPATH": "${workspaceFolder}/lib:${PYTHONPATH}"
      },
      "args": ["generate_standards_map"],
      "django": true,
      "justMyCode": false
    },
    {
      "name": "Python: Validate API enums",
      "type": "debugpy",
      "request": "launch",
      "program": "${workspaceFolder}/manage.py",
      "env": {
        "PYTHONPATH": "${workspaceFolder}/lib:${PYTHONPATH}"
      },
      "args": ["validate_api_enums"],
      "django": true,
      "justMyCode": false
    },
    {
      "name": "Python: Handle Update Requests",
      "type": "debugpy",
      "request": "launch",
      "program": "${workspaceFolder}/shared_tools/scripts/copo_record/update_requests/handle_update_requests.py",
      "env": {
        "PYTHONPATH": "${workspaceFolder}/lib:${PYTHONPATH}"
      },
      "cwd": "${workspaceFolder}/shared_tools/scripts/copo_record/update_requests",
      "args": [],
      "django": true,
      "justMyCode": false
    }
  ]
}
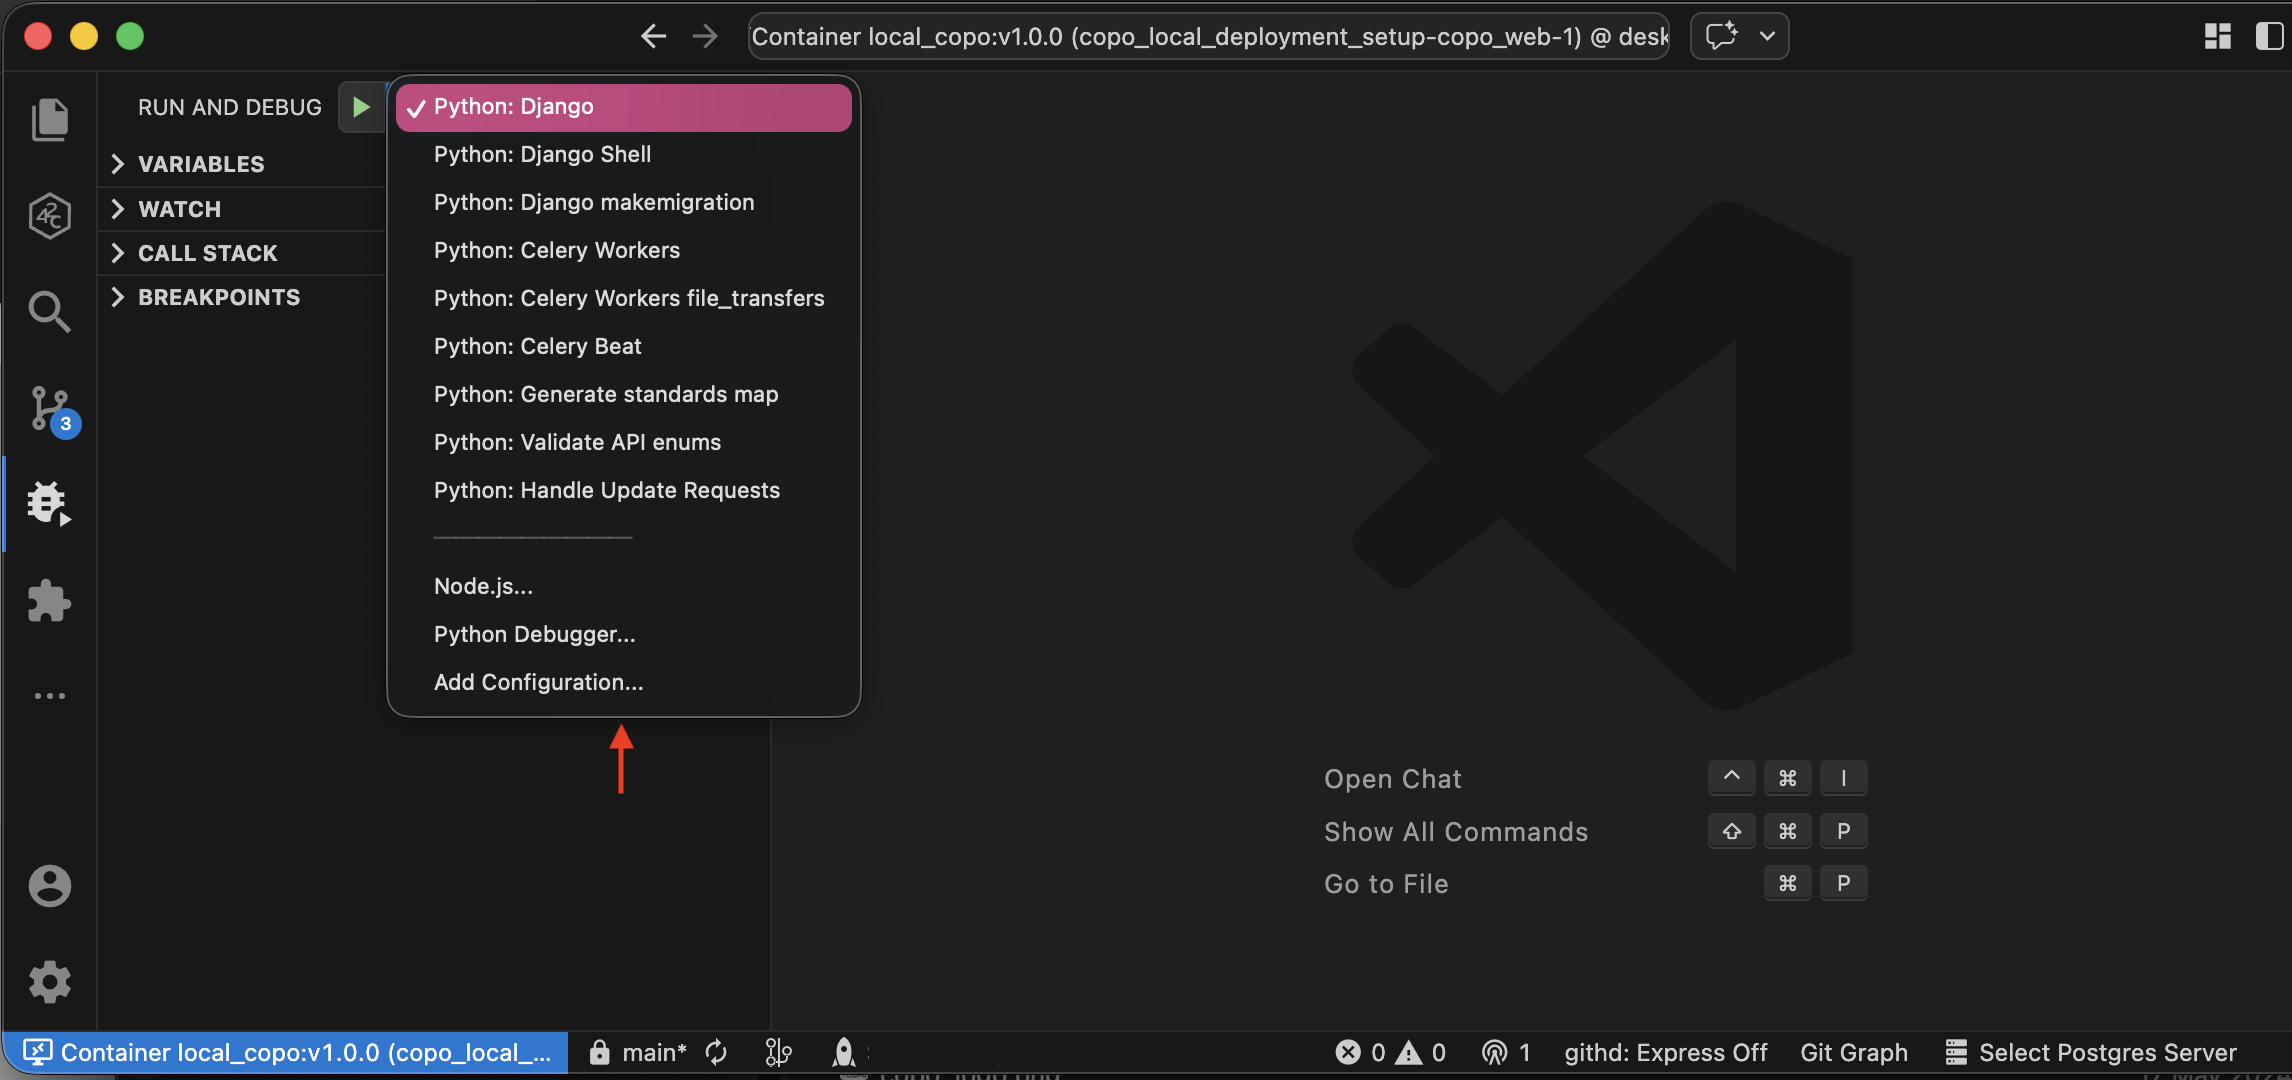
List of configurations set up in the launch.json file
7.3.6: Access the COPO project application locally on port 8000 by searching for http://127.0.0.1:8000 in your web browser.
Searching for http://127.0.0.1:8000/copo will take you to the Work profiles page of the application. An Orcid login will be required to access the application. You can create an Orcid account after which, you can use the credentials to log into the application.
Useful Git Commands
git config --global user.name "<github-username>"
git config --global user.email "<github-email-address>"
git tag <tag-name>
git push origin <tag-name>
git tag -d <tag-name>
Project Setup Without Docker
Choose the appropriate link below based on your operating system (OS) to set up the project locally.