Frequently Asked Questions
Hint
To view the entire answer to a question, collapse the answer by clicking the button below.
Assemblies
What are the types of files that are required for assembly submissions in COPO?
Click to view answer
See the European Nucleotide Archive’s (ENA’s) documentation for details about the types of files that can be submitted for assembly submissions.
How can I assign a locus tag to assemblies?
Click to view answer
Hint
Each profile in COPO is known as a study or project in ENA (after reads have been submitted).
Note
Reads submission must be done in order for a locus tag to be assigned to the project.
This is because a project submission is done to European Nucleotide Archive (ENA) once reads submission has been completed.
You can assign a custom locus tag when creating a profile in COPO. See the image below for guidance.
If a locus tag is not assigned, ENA will automatically assign a locus tag to your assembly after it has been submitted in COPO and deposited to ENA.
See ENA’s documentation for more details. The documentation outlines rules that the locus tag prefix should conform to.
Are assemblies and sequence annotations submitted at the same time in COPO?
Click to view answer
No, assemblies and sequence annotations are submitted separately in COPO.
It is possible that the notion of simultaneous submission arises from the use of the EMBL flat file format, which combines both annotated assemblies and sequence annotations. This may lead to the impression of a simultaneous submission.
If you are submitting sequence annotations directly to the ENA, EMBL files must be used, as they include both assemblies and annotations together.
On the other hand, sequence annotations can be submitted separately to ENA if your data files are in formats such as
.gff
or .fasta
.
Note
File submissions depend on how users prepare and generate their data. For instance, FASTA files are still essential for storing and sharing sequence data but, they are not sufficient for representing detailed genomic annotations.
For annotation tasks, formats like GFF, GTF and BED are more appropriate because they provide structured information about genomic features, gene structures and functional elements. Thus, while FASTA is not outdated, it is often used alongside more specialised formats for annotation purposes.
Please refer to the following sections in ENA’s documentation for more information:
Are accessions assigned in assembly submissions after studies are released?
Click to view answer
No, accessions are assigned after assembly submissions are done in COPO.
The study release only makes the submissions public and available for viewing on repositories such as the European Nucleotide Archive (ENA) and National Centre for Biotechnology Information (NCBI).
See the Retrieving Accessions section for more information.
Dashboard
How can I view accessions after a metadata submission is made in COPO?
Click to view answer
Hint
GenBank accession numbers follow the format GCA_XXXXXXXXX
. They are automatically assigned by
ENA and can be viewed on the
National Centre for Biotechnology Information (NCBI) website using the
link: https://www.ncbi.nlm.nih.gov/datasets/genome/?bioproject=<project-id>
where <project-id>
is the
project ID (also known as study ID or profile ID)
associated with the profile used to submit the files in COPO.
- Option 1: View accessions in the data table
-
Scroll to any column that ends with
accession
as depicted in the image below to view the accessions.Note
The table row is highlighted in red in the image below because the files associated with the record are either still being processed or have encountered issues during processing.
- Option 2: Accessions web page
-
Click the button.
The accessions web page will be displayed.
- Option 3: Accessions dashboard
-
Navigate to the Accessions dashboard to view accessions
Is there a way to analyse metadata submissions?
Files
How do I know when data files that have been uploaded to COPO are public at European Nucleotide Archive (ENA)?
See Checking ENA File Processing Status section for more information.
Why can’t I upload more data files in COPO?
Click to view answer
Note
The total maximum file size that can be uploaded from your local (computer) system is around 2 GB. If you have a file larger than 2 GB or have multiple files whose combined total size exceeds 2 GB, please submit the file(s) via the terminal.
If you cannot upload new files to COPO on the Files web page, it is likely that you have reached the maximum number of data files that can be uploaded.
Please delete some files to free up space for new files.
Images
How can I submit images in COPO?
Click to view answer
Please see the Images Submission section for guidance on how to submit images in COPO.
What are the factors that can lead to errors during the image upload process in COPO?
Click to view answer
Note
Images can only be submitted after samples have been uploaded in the Upload Sample Spreadsheet dialog. The max total image size should be no more than 2GB.
Images can only be submitted via a ToL [1] profile. Please see: Steps to Create a Tree of Life Profile for guidance.
The file name of sample images must be named as
{Specimen_ID}-{n}.[jpg|png]
where{n}
is the image number,{Specimen_ID}
is the specimen ID of the sample in the manifest andjpg
orpng
is the extension of the file.
Important
The button will only be enabled after you upload a manifest in the Upload Sample Spreadsheet dialog. This process must be completed in one go; you cannot close the dialog and return later to upload images. The images rely on metadata from the sample manifest, so the button becomes active immediately after the manifest is uploaded, allowing you to add images in the same session.
Errors occur due to several reasons. An error message will be displayed detailing the issue(s) encountered and potential resolution(s). If you are uncertain how to proceed, please contact the .
Other potential reasons and solutions for errors include but are not limited to:
Uploading images where the total size of the images exceeds 2GB (the maximum allowable file size) may result in errors.
Common web browser error messages include
Error 0: error
though the specific message may vary by browser, as the error is browser-generated.Workaround: Upload smaller batches of images separately. You will need to first upload the manifest, any applicable permits, and then upload the images in batches, as images cannot be uploaded directly and all at once.
Other
When was the COPO project launched?
Click to view answer
In September 2014, the COPO project was launched under the Biotechnology and Biological Sciences Research Council (BBSRC) with the aim of improving open access to and management of data within plant research. It was known as Collaborative Open Plant Omics at that time and is based at the The Genome Analysis Centre (TGAC).
Now, the project is known as Collaborative OPen Omics. It is based at the Earlham Institute (EI) formerly known as TGAC.
2014 - 2022 |
2023 - PRESENT |
---|---|
See also
Download a seminar presentation
which gives an overview of the evolution of the COPO project since its inception in 2014 to the present day
Who are the developers of the COPO project?
Click to view answer
Please see:
COPO Team section on the About web page of the COPO’s website for current software developers of the project
Former Team Members and Contributors section on the About web page of the COPO’s website for the previous developers and contributors of the project
Permits
Can I view or download permits that I have uploaded in COPO?
Click to view answer
Yes, permits can be retrieved and downloaded by selecting the desired sample record(s) on the Samples web page
Then, clicking the button on the web page.
Why am I unable to upload permit one after the other?
Click to view answer
Warning
If you have more than one permit file to upload, they must be uploaded at the same time i.e. after you have clicked the button, navigate to the directory where the permits are stored and
CTRL + click
all of the permits so that all the permits are highlighted and uploaded at the same time.
All permit files have to be selected/opened from the directory and uploaded together not one after the other.
How can I resolve ‘Conflicting data…’ error when uploading permits in COPO after having uploaded a manifest?
Click to view answer
The error message Conflicting data
is displayed when at least one of the following occurs:
-
The permit file name provided in the manifest does not end with the extension
.pdf
or.PDF
Resolution: Rename the name of the permit file so that it ends with the extension,
.pdf
or.PDF
then, reupload the manifest -
In the uploaded manifest, different permit file names are associated with the same SPECIMEN_ID
Resolution: Provide a unique permit file name for each SPECIMEN_ID or provide the same file name for permit files that are associated with the same SPECIMEN_ID in the manifest. Then, reupload the manifest.
Why do I encounter the error ‘No xx permit found for xx ‘SPECIMEN_ID’…Filename of permit must be named xx’ after having uploading the permit files?
Click to view answer
This error message occurs when at least one of the following occurs:
-
The manifest uploaded requires multiple permit files but they were uploaded separately i.e. one after the other.
Resolution: Please refer to Why am I unable to upload permit one after the other? FAQ for more information.
-
The permit file name uploaded from your local system actually ends with
.pdf.pdf
(or.PDF.PDF
) and not.pdf
(or.PDF
)Resolution: Ensure that the name of the permit file ends with the
.pdf
or.PDF
extension only.If you are using a Windows operating system (OS) to upload permits, Windows OS by default, hides file extensions which results in it not being visible to you.
If you would like to see the file extension, you can enable it by following these guidelines.
Reupload the manifest as well as the permit files after the resolutions have been made.
Profiles
How can I be added to a profile group?
Click to view answer
* Make a request to the :email:`COPO team
How can I create a profile on COPO?
Click to view answer
* Click the |add-profile-button| button then, fill in and save the form displayed. .. figure:: /assets/images/profile/profile_add_form.png :alt: Profile types dropdown menu :align: center :target: https://raw.githubusercontent.com/TGAC/COPO-documentation/main/assets/images/profile/profile_add_form.png :class: with-shadow with-border :width: 400px :height: 400px **Add Profile form: Choosing a Profile Type**
-
View the following video to see how to create a profile.
How can I add a subproject to a profile on COPO?
Click to view answer
In the Add Profile form, choose the desired subproject(s) from the list of associated projects as shown below.
See the Secondary Projects section for information about the available subprojects.
How can I add a subproject or secondary project to a primary project in ENA/Biosamples?
Click to view answer
Contact the with the request providing the project accession of the child/subproject and the project accession of the parent/primary project.
How can I edit or delete a profile that I have created in COPO?
Click to view answer
Click the icon that is associated with the desired profile.
The option to edit or delete a profile record will be displayed once clicked.
The web page will refresh after the task has been completed successfully.
How many profiles can I have in COPO?
You can have as many profiles as needed to represent your research objects.
For instance, you can create a profile to represent work done as part of a grant, subproject within a project or a PhD project.
How can I view more profiles that I have created in COPO?
Scroll downwards on the web page.
More profiles that you have created will be loaded.
How can I view more information about a profile that I have created in COPO?
Click to view answer
Note
The button will only be associated with a profile if the profile has at least one of the following information.
Click the button associated with the profile.
-
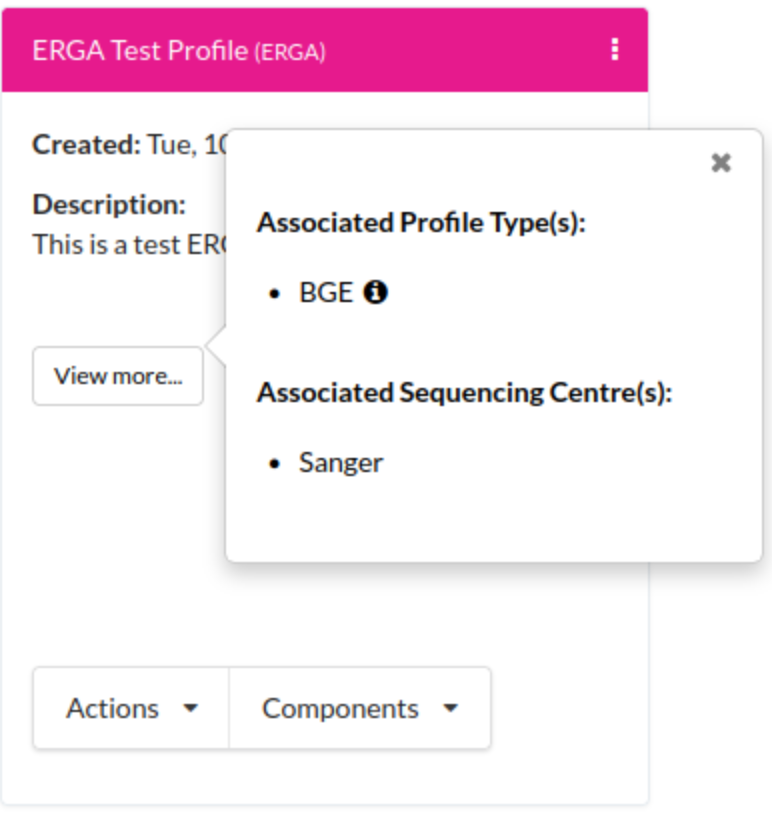
After the button is clicked, a popup dialog will show at least one of the following information if it is available:
Release Status (if applicable)
Release Date (if applicable)
Associated Profile Type(s)
Sequencing Centre
How can I create components for a profile?
Click to view answer
Navigate to the work profile web page
Click the button
Fill in then, save the form that is displayed
Click the button associated with the profile record to view the component of the action that was performed
How can I make profiles or projects public or visible in European Nucleotide Archive (ENA)?
Click to view answer
Hint
Profiles (in COPO) are referred to as projects or studies (in ENA).
See Releasing Profiles (Studies) section for more information.
How can I set the release date for public profiles or projects after having submitted reads?
Click to view answer
Hint
Profiles (in COPO) are referred to as projects or studies (in ENA).
It is not possible to set the release date for profiles or projects after reads have been submitted.
By default, once reads are submitted, the project is private and the release date is set to two years from the submission date.
You can, however, make the project public at any time before the release date by following the steps below or refer to the Releasing Profiles (Studies) section to make the profile public at any time after the submission.
How can I view released studies on European Nucleotide Archive (ENA)?
Click to view answer
Hint
Profiles (in COPO) are referred to as projects or studies (in ENA).
If you know the project accession and/or profile title, you can find the corresponding project on the Accessions dashboard. By clicking the hyperlink associated with the project accession, you will be navigated to the associated study record on ENA.
See also
Retrieving accessions section for more information.
What are the names of the sequencing centres whose samples are brokered through COPO?
Click to view answer
Currently, there are 20 sequencing centres whose samples are brokered through COPO.
Each COPO ERGA profile should be associated with a sequencing centre.
The following are the names of the sequencing centres:
|
|
What happens when a profile is updated in COPO?
Click to view answer
When a profile is successfully updated in COPO, the changes made to the profile will be reflected in the research objects such as samples, reads, assemblies or files associated with the profile.
For example, if a profile is updated to include -
a new associated profile type, the new associated profile type will be displayed in the sample records associated with the profile.
a new ENA locus tag, the new ENA locus tag will be associate displayed in the reads, sequencing annotations and/ assembles associated with the profile.
Reads
How do I fill in the Reads manifest to submit paired reads?
Click to view answer
-
Ensure that the Reads manifest contains the following:
PAIRED as the value for the Library layout column
File names in the File name column separated by a comma
See below for a snapshot of a Reads manifest for paired reads:
What are the types of files that are required for read submissions in COPO?
Click to view answer
See the European Nucleotide Archive’s (ENA’s) documentation for details about the types of files that can be submitted for read submissions.
What are the factors that lead to errors during the reads update process in the COPO project?
Click to view answer
Hint
The words, manifest
and checklist
are used interchangeably. They both refer to a spreadsheet.
Errors occur due to several reasons. An error message will be displayed detailing the issue(s) encountered and potential resolution(s). If you are uncertain how to proceed, please contact the .
Updates to reads can be made by uploading the amended manifest to the same checklist and profile initially used
for the submission. Please note that this is possible if the values in the Sample
, File checksum
,
File name
and Library layout
columns remain unchanged in the manifest. If any of these values change, errors
will occur during the update process.
This is because the value in the Sample
column serves as the key for each row in the Reads
manifest. Each unique sample in the manifest corresponds to a different biosample, which is linked to the values in
the File checksum
, File name
and Library layout
columns.
Other potential reasons for errors include but are not limited to:
Uploading null or empty files and associating them with rows in the manifest
Assigning files to samples that already have the same files attached will produce errors
Are accessions assigned in reads submissions after studies are released?
Click to view answer
No, accessions are assigned after reads submissions are done in COPO.
The study release only makes the submissions public and available for viewing on repositories such as the European Nucleotide Archive (ENA) and National Centre for Biotechnology Information (NCBI).
See the Retrieving Accessions section for more information.
Samples
How can I update values for samples that I have submitted in COPO?
Reupload the amended manifest.
Note
The manifest must be reuploaded in the same profile that the samples were submitted in.
If the manifest requires permits, the permits must also be reuploaded so that the samples’ updates can be processed.
The desired value(s) will be updated once the field value is not a compliance field [1].
See the Updating Samples section for information about which field values can be updated.
How to check the status of samples that have been accepted or rejected as a sample submitter?
Click to view answer
Option 1: The Status column in the samples data table will display the status of the sample record on the Samples web page.
Option 2: The Error column in the samples data table will display an error message if the sample record has been rejected or if there are any errors associated with the sample record.
Can I delete samples that have submitted?
Click to view answer
No, samples cannot be deleted after the manifest have been submitted.
Can I retrieve samples or the manifest that have been submitted?
Click to view answer
Yes, see the How to Download Submitted Sample Manifest section for more information.
Is there a limit to the number of samples that can be included in a single manifest?
Click to view answer
Yes, there is a limit to the number of samples that can be included in a single manifest uploaded to COPO.
A threshold of 1,000 samples is recommended with larger sets split across multiple manifests under the same profile or different profiles. This is because the validation process can be lengthy and resource-intensive, requiring significant memory, which may cause the webpage to crash or lag if there are too many rows to process.
Why doesn’t the downloaded sample manifest contain the correct samples or metadata?
Click to view answer
When you click the button, the samples downloaded are associated with a specific manifest ID, which can be found in the Manifest Identifier column of the data table.
If multiple manifests are uploaded to the same profile, each will have a different manifest ID, so ensure you click the button for the record corresponding to the manifest ID you need.
Guidance: Check the Manifest Identifier column to ensure the manifest ID is the same for all the samples you wish to download. If you identify records with different manifest IDs, click on each record with a different manifest ID and then click the button to download the samples associated with that specific ID.
In summary, if there are records with varying manifest IDs, you will need to click each record one by one then, click the button for each to download the correct manifest.
How can I view images that have been uploaded?
How can I download permits that have been uploaded?
What are the formats that I can download samples in?
Click to view answer
The following are the formats that samples can be downloaded in:
-
Microsoft Excel Spreadsheet format (
.xlsx
)See the Downloading manifest in spreadsheet format section for more information.
-
Comma-separated values (csv) format (
.csv
)On the Samples web page, click the button to download a manifest in csv format.
See How to access Samples web page section for guidance.
How can I submit virtual samples in COPO?
Click to view answer
Virtual samples are research objects that are submitted to COPO under a Genomics profile.
See the Submitting Virtual Samples section for more information.
What are the types of genomic metadata submissions that can be made in COPO?
Click to view answer
Note
Data files related to your desired genomic metadata submission type must be uploaded via the Files web page before submission.
See the Files Submission section for more information.
The following are types of genomic metadata submissions that can be made in COPO. Please click the desired link to view more information about each submission type.
Genomic metadata submissions can be made via the following methods:
Under a Genomics profile - this method is applicable if the genomic data to be submitted is not associated with any particular project brokered by COPO.
Under a Tree of Life (ToL) profile - this approach is applicable if the genomic data to be submitted is associated with a project brokered by COPO and there are existing or submitted sample metadata.
Why do I get a ‘PROXY_TISSUE_VOUCHER_ID_FOR_BIOBANKING’ error when uploading or updating a manifest?
Click to view answer
If you encounter the error, The ID should be in the format of institute unique name:collection code:id or institute
unique name:id and separated by \"|\" and the ID should be registered already.
, when trying to upload or update
the field, PROXY_TISSUE_VOUCHER_ID_FOR_BIOBANKING, in a manifest, please ensure that the format of the ID is
institution_unique_name:collection_code:voucher_id institution_unique_name:voucher_Id
.
Are accessions assigned in sample submissions after sample manifests are uploaded?
Click to view answer
No, accessions are assigned after sample submissions have been accepted by a sample manager.
The acceptance makes the submissions public and available for viewing on repositories such as the European Nucleotide Archive (ENA) and National Centre for Biotechnology Information (NCBI).
See the Retrieving Accessions section for more information.
What are the steps for submitting sample metadata in COPO and ensure it appears in public repositories?
Click to view answer
Note
Click the button below to view its content.
Prerequisites
-
Request to be added to a manifest group associated with your desired project by sending an email to the COPO team at
Hint
Visit the Projects Brokered through COPO section to see a list of COPO-brokered projects.
-
Complete a manifest which is a spreadsheet containing metadata for the desired project.
If you do not have a blank manifest for the project, you can refer to the Downloading Manifest Templates & Standard Operating Procedures (SOPs) section for guidance on downloading one to record the metadata.
-
Log into the COPO website then, you’ll be navigated to the Work Profiles web page
Refer to the Accessing COPO Website section for guidance.
-
Create a profile.
For more information, check the Steps to Create a Tree of Life Profile section.
-
Click the button attached to the created profile then, the in the popup dialog to navigate to the Samples web page.
See the Accessing the Samples’ Web Page section for additional information.
-
Upload the completed manifest.
Visit the Samples Submission section for guidance on submitting samples.
Note
Choose the desired type of submission listed in that section to be directed to the page for submitting the manifest of that type.
-
COPO validates the uploaded manifest.
-
If there are errors and/or warnings during the validation process, our system will provide messages to help resolve them.
If you encounter errors that you are unable resolve, we are happy to assist. Contact the detailing the issue(s) encountered.
If you encounter warnings, they are just informational and will not prevent the upload process from proceeding, as long as there are no errors. Once there are no errors related to the field and you are satisfied with the value, the upload process will continue when you click the button if it is the first time you are uploading the manifest or the button if you are updating the manifest.
-
-
If applicable, upload permits and/or images after uploading the sample manifest in the same attempt. Use the appropriate button in the Upload Sample Spreadsheet dialog to complete this step.
Important
This process must be completed in one go; you cannot close the dialog and return later to upload the permits and/or images. The permits and/or images rely on metadata from the sample manifest, and as such they must be added in the same session.
Note
The Upload Sample Spreadsheet title of the dialog will change depending on the type of submission that you are making e.g. Upload ERGA Sample Spreadsheet.
-
Sample managers will be notified of the submission and will review it to accept or reject the samples.
-
The metadata of accepted samples is deposited to ENA, where accession numbers are assigned and reflected in COPO. These samples can then be queried in public repositories like European Nucleotide Archive (ENA) and National Centre for Biotechnology Information (NCBI) using the assigned accession numbers.
The accession numbers are displayed in the columns – Biosample Accession, SRA Accession, and Submission Accession – in the data table on the Samples web page in COPO. While each accession uniquely identifies a sample record, the biosample accession is primarily used as the identifier.
Additionally, each cell/value in the aforementioned accession columns contains a hyperlink to the metadata on ENA, allowing you to directly access the data there.
For more details on retrieving accession numbers, please refer to the Retrieving Accessions section.
See also
Are accessions assigned in sample submissions after sample manifests are uploaded? FAQ
If you intend to submit other types of metadata in COPO such as assemblies, sequence annotations, barcoding manifests and reads submissions and would like to make the submitted metadata available in public repositories, please refer to the Releasing Profiles (Studies) section for more information.
How can genomic metadata be associated with submitted or existing sample metadata in COPO and ensure it appears in public repositories?
Click to view answer
Note
Click the button below to view its content.
Prerequisites
Please refer to the What are the steps for submitting sample metadata in COPO and ensure it appears in public repositories? FAQ for guidance on submitting sample metadata in COPO. The genomic metadata submission process depends on the sample metadata submission process.
In COPO, genomic metadata can be associated with submitted or existing sample metadata through the steps below:
-
Upload the data files associated with the type of genomic metadata to be submitted on the Files web page.
See the Files Submission section for guidance.
-
Upload the genomic metadata to the same profile used for the sample manifest submission on the Work Profiles web page.
Each genomic metadata submission type requires wither a form or manifest (spreadsheet). Some fields may be linked to previously submitted sample metadata.
Click the button associated with the profile then, click the appropriate option - button, button, button or in the popup dialog to navigate to the relevant web page.
See also
Releasing Profiles (Studies) i.e. making genomic metadata public after submission in COPO in public repositories
What are the types of genomic metadata submissions that can be made in COPO? FAQ for guidance on the types of genomic metadata
Sample Managers
How can I be assigned as a sample manager?
Click to view answer
Make a request to the indicating the type of profile group that you would like to be assigned as a sample manager.
The permission will be granted after the request has been approved.
How can I know if I have been assigned as a sample manager?
Click to view answer
The button will be displayed on the web page.
The accept/reject samples web page will be displayed once the button is clicked.
Alternatively, if you can navigate to the Accept/Reject Samples’ web page with an Unauthorisation error web page being displayed then, you are a sample manager.
How can I search for a particular profile or sample on the Accept or reject web page?
Click to view answer
See Guidelines for Searching Profiles and Samples on the Accept or Reject Web Page section for guidelines on querying profiles and sample records on the Accept or Reject Samples web page.
How can I accept or reject samples that users have submitted?
Click to view answer
Note
See Accessing the Accept or Reject Samples web page section for guidelines on accessing the Accept or Reject Samples web page.
See Accepting or Rejecting Samples section for more information.
How can I download sample manifests that have been submitted by manifest providers or sample submitters?
Can I download permits that users have uploaded in COPO?
Click to view answer
Yes, on the Accept or Reject Samples web page, permits can be downloaded by selecting the desired sample record(s) then, clicking the button on the web page.
See Downloading permits section for more information.
Can I view images that users have uploaded in COPO?
Click to view answer
Yes, on the Accept or Reject Samples web page, images can be viewed by selecting the desired sample record(s) then, clicking the button on the web page.
See Viewing images section for more information.
If I belong to more than one sample manager manifest group, how can I view or accept samples that belong to them?
Click to view answer
Note
The manifest dropdown menu will only be displayed on the Accept or Reject samples web page if you as a sample manager, belongs to more than one sample manager manifest group.
If the dtol sample manager group dropdown menu option is selected, both Aquatic Symbiosis Genomics (ASG) profiles and Darwin Tree of Life (DToL) profiles will be displayed in the All profiles tab and/or Profiles for My Sequencing Centre the Accept or Reject samples web page will be displayed (if any exists).
Choose desired sample manager group from the manifest group dropdown menu.
-
Click the button to accept or reject samples.
See Viewing images section for more information.
How can I tell if sample records are still awaiting review by another sample manager?
Click to view answer
-
If samples require more than one sample manager to accept or reject them, the samples will be displayed in the Pending Samples tab until all sample managers have accepted them. Once all sample managers have accepted the samples, the samples will be displayed in the Accepted Samples tab.
As shown in the image below, sample records that are awaiting another acceptance will be highlighted yellow or amber and the date when the records have been accepted will be displayed in the Approval Date column in the samples data table.
Refer to the Associated TOL (Tree of life) Project column to view the associated project(s) that the sample record belongs to. See the image below for an illustration.
In the example above, the sample record is associated with both BGE and SANGER (Sanger Institute) (associated) project types. A BGE sample manager has accepted the sample record, which is reflected in the Approval Date column in the data table. The record is highlighted in yellow to indicate that it is still awaiting acceptance from another sample manager.
Hint
The Approval Date column displays the date when the sample record was accepted by the sample manager as well as the associated project that the sample manager belongs to.
The Associated TOL (Tree of life) Project column displays the associated project that the sample record belongs to.
After the sample record has been accepted by all sample managers, the sample record will be displayed in the Accepted Samples tab as shown in the image below.
In the example above, the sample record is associated with two projects: BGE and SANGER (Sanger Institute), as shown in the Associated TOL (Tree of Life) Project column. The sample managers assigned to both associated project types have approved the sample record and the Approval Date column has been updated in the samples data table.
How to check the status of samples that have been accepted or rejected as a sample manager?
Click to view answer
Option 1: Accepted samples can be viewed in the Accepted Samples tab while rejected samples can be found in the Rejected Samples tab on the Accept or Reject Samples web page.
Option 2: The Status column in the samples data table will display the status of the sample record.
Option 3: The Error column in the samples data table will display an error message if the sample record has been rejected or if there are any errors associated with the sample record.
Option 4: The Status log will display a chronological list of the status of the sample record as shown in the images below. It is located on the right of the Accept or Reject Samples web page below the top navigation bar.
Hint
If you hover over the Status log, it will expand to display more information about the status of the sample record.
How can I get a better view of sample record information displayed on the Accept or Reject Samples web page?
Click to view answer
Click the button to toggle the profile panel visibility on the Accept or Reject Samples web page to either hide the profile panel and view more sample records or show the profile panel to view more profiles.
Sequence Annotations
Are sequence annotations and assemblies submitted at the same time in COPO?
See answer here
Are accessions assigned in sequence annotation submissions after studies are released?
Click to view answer
No, accessions are assigned after sequence annotation submissions are done in COPO.
The study release only makes the submissions public and available for viewing on repositories such as the European Nucleotide Archive (ENA) and National Centre for Biotechnology Information (NCBI).
See the Retrieving Accessions section for more information.
Footnotes